# Y/N Template Component Plugin for Oracle APEX
Oracle APEX Interactive Reports often display boolean or flag columns (like `active_yn`, `enabled_yn`) with plain text values "Y" or "N". While functional, this approach lacks visual clarity and modern UX standards.
In this post, we'll explore how to create a **custom template component plugin** that automatically displays **green checkmarks (✓)** for "Y" values and **red crosses (✗)** for "N" values in your APEX reports, providing instant visual feedback to users.
[Complete Implementation on GitHub](https://github.com/Aftorres02/blog_app_examples/tree/master/post_2026/1_plugin_y_n) - Full working code examples
## What is a Template Component Plugin?
A Template Component Plugin in Oracle APEX is a reusable UI component that can be applied to report columns, regions, or other UI elements. It uses APEX's declarative template syntax to transform data values into custom HTML output, allowing developers to create consistent, branded user interfaces without writing complex JavaScript.
This implementation creates a **template component plugin** that transforms Y/N values into intuitive visual indicators:
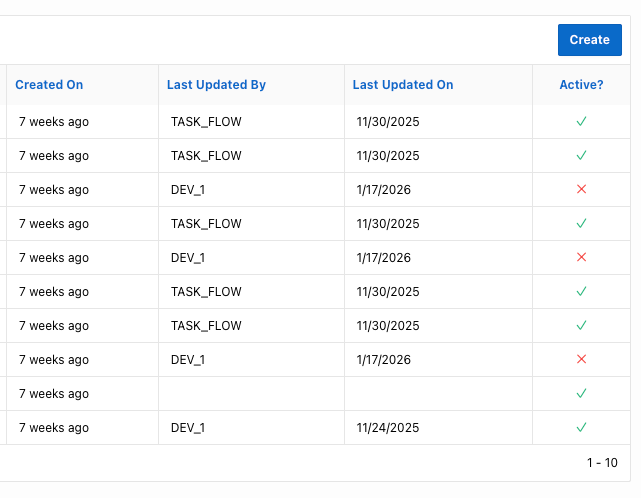
- ✅ **Green checkmark (✓)** for "Y" values - indicating active, enabled, or positive states
- ❌ **Red cross (✗)** for "N" values - indicating inactive, disabled, or negative states
### Visual Result
The plugin displays values as shown in the following table:
## Installation Instructions
### Step 1: Install the CSS File
First, upload the [`y_n.css`](https://github.com/Aftorres02/blog_app_examples/blob/master/post_2026/1_plugin_y_n/y_n.css) file as a workspace static file at `css/y_n.css`. The file contains the following styles:
```css
.icon-check {
color: #10b981;
font-size: 0.9rem;
}
.icon-x {
color: #ef4444;
font-size: 0.9rem;
}
```
### Step 2: Install the Template Component Plugin
Install the template component plugin by running the [`template_component_plugin_y_n.sql`](https://github.com/Aftorres02/blog_app_examples/blob/master/post_2026/1_plugin_y_n/template_component_plugin_y_n.sql) script:
```sql
-- Run the plugin installation script
@template_component_plugin_y_n.sql
```
This creates a plugin named **Y_N** that can be used as a column template in Interactive Reports.
## Usage in Interactive Reports
### Applying the Plugin to a Column
1. Navigate to your Interactive Report in Page Designer
2. Select the column you want to format (e.g., `active_yn`)
3. In the column properties, go to **Column Formatting** → **Template**
4. Select **Y_N** from the Template Component dropdown
5. In the **Value** attribute, select the column containing your Y/N value (typically the same column)
### Example
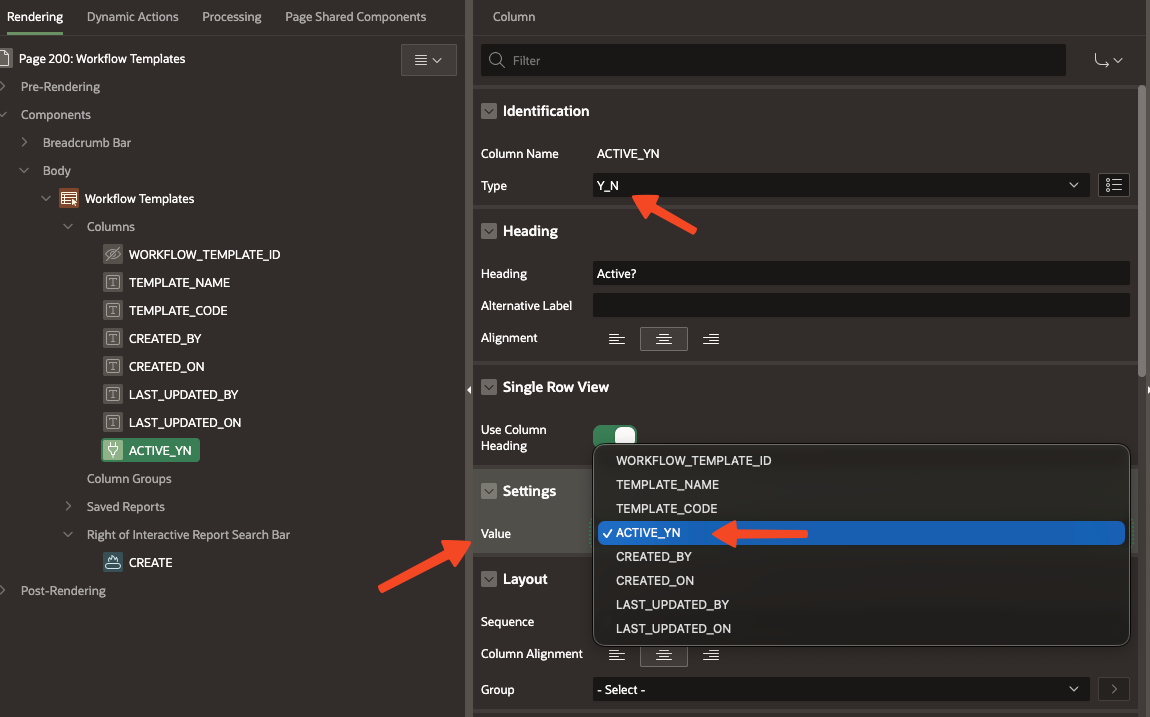
After applying the Y_N template component to the `active_yn` column, the values will automatically display as green checkmarks (✓) for "Y" and red crosses (✗) for "N".
## Implementation Details
### Template Component Structure
The plugin uses APEX's declarative template syntax to conditionally render icons based on the column value: template_component_plugin_y_n.sql
``` html
{if APEX$IS_LAZY_LOADING/}
#VALUE#
{else/}
{if ?VALUE/}
{case VALUE/}
{when Y/} ✓
{when N/} ✗
{otherwise/}
{endcase/}
{endif/}
{endif/}
```
### CSS Styling
The CSS file provides color coding for immediate visual feedback:
- **Green (#10b981)**: Tailwind's `emerald-500` color for positive/active states
- **Red (#ef4444)**: Tailwind's `red-500` color for negative/inactive states
- **Font Size (0.9rem)**: Slightly smaller than default text for better proportion in tables
## Customization Options
### Changing Colors
To modify the colors, edit the `css/y_n.css` file:
```css
.icon-check {
color: #22c55e; /* Change to your preferred green */
font-size: 0.9rem;
}
.icon-x {
color: #dc2626; /* Change to your preferred red */
font-size: 0.9rem;
}
```
---
**Files in this post:**
- [`template_component_plugin_y_n.sql`](https://github.com/Aftorres02/blog_app_examples/blob/master/post_2026/1_plugin_y_n/template_component_plugin_y_n.sql) - Plugin installation script
- [`y_n.css`](https://github.com/Aftorres02/blog_app_examples/blob/master/post_2026/1_plugin_y_n/y_n.css) - CSS styling file
- `plugin_y_n_en.md` - This blog post (English)
- `plugin_y_n_es.md` - Blog post (Spanish)